Thursday, December 18, 2008

Indoor Jewelry/product Studio/Light Box

Indoor Jewelry/product Studio/Light Box

I have noticed a number of people asking about portable studio's (Light Boxes) and which one is the best to purchase, or can a good one be recommended.

  If you have money to purchase one then almost "ANY" studio will work fine.  If you want to SAVE the money however, I have an inexpensive alternative.

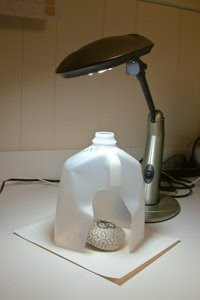
If you drink milk out of  4 litre (1 gallon) containers, then you already have the makings of an indoor studio.  Other translucent containers can be used as well.

The typical aim with a studio is to create diffused lighting so that shadows are not harsh, there are not "blown out" specular highlights, and to create even lighting or to more directly control the lighting..  All of this can be done using a cut out milk container.  I'm not going to give directions on how to do this as I think it should be self-evident from the photo what is involved, i.e. cut out the bottom and part of one side;)

You can then shine a light through the container and depending on how "creative" you wish to be, you can create very soft diffused light (light farther from container), angled light (have light from only one side), even light (light from top and sides), or something in between.  The only limit is your imagination. 

 Side lighting, it should be noted, will highlight the textures the best, for almost anything being photographed.  For some jewelry, having the textures show may not be a positive however as every nick, scratch, piece of dust, etc. will be seen.

In the setup shown I have used an adjustable "daylight" lamp.  this lamp provides even lighting with a daylight temperature of 5500k.  I then have a piece of Hahnemühle Bamboo paper which has a natural warm-tone to it.  I have also used a piece of brain coral for putting the earrings on, but I'm sure most of you have more creative ways to display your items.

I chose to light from above in this instance, to give some contrast shadows, while still retaining fairly even lighting.  If you have off-camera flashes, they can be used instead of a lamp for more precise control of the lighting.

Notice how harsh the light is on the top of the milk container, yet, the inside is relatively soft and diffused.  You can create more even lighting by angling and moving your light source closer or farther away.  I wanted "some" shadows so this worked for me in THIS situation.

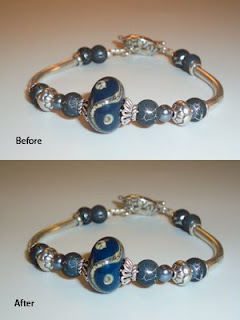
Thanks to CanadianRockies (Handmade Modern and Organic Metal Jewelry Art) for the Rustic Fused Fine Silver Hoops for this demonstration.

On another note. You DO NOT NEED an expensive camera to do your product shots with.  

In fact, for illustrative purposes I took these photos with the first digital camera I ever owned, a Fujifilm FinePix S602Zoom, that was purchased in 1998!!!  That is five lifetimes in the digital world.  Incredibly expensive at the time, but nowhere near the quality of ANY digital point and shoot out there today.

It has a whopping 3, count them, 3 megapixels!!  It is not the camera that takes the photo... it is YOU the photographer.  A more expensive camera will NOT improve your photography.  Using the camera you presently have or an inexpensive camera or almost ANY on the market will give you the opportunity to make more than adequate photos for showing off your products.

More on how to take advantage of what your camera can do in another post.
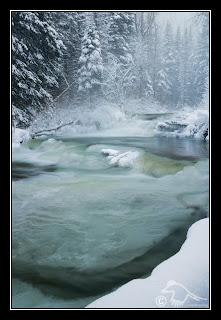
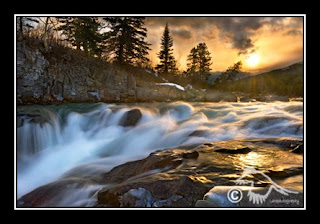
Photo of the Day.
"Light is the source of all form. Ignore the light at your own peril!"

The Photo of the Day as well as all my photos are available as LImited Editoin Prints, Small Prints, or as Fine Art Photography Cards that come with their own envelope at Larsphotography.com and Larsphotography.etsy.com.


Saturday, December 13, 2008

Colour Correction Using Hue/Saturation

Thanks to Willow Tree Designs for allowing me to use her photograph of her jewelery to illustrate this post.

Concerned about the rust colour cast in her photo I offered to fix the cast and show the process
 involved as well.

Once opened in photoshop I chose to use the hue-saturation adjustment layer method to fix this cast.  There are numerous other ways in which this could be done but I chose this one for it's ease and quickness.
Once I added the adjustment layer I chose the adjustment slider (circled in red) and then clicked on the offending colour.  You will note that the drop down menu then turned to :Reds 2 which meant that just those colours were selected.  I then moved the sliders to the numbers you see in the capture.  

This is where a little exper-imentation come into play and you will have to see which numbers will work best.  It is all done on an adjustment layer so it is non-destructive and you can make changes and go back to them as many times as you wish until you have the desired effect that you would like.  If you are using an older version of photoshop... you will notice that the adjustment slider is not there.  In those versions you will simply use the eyedropper instead.


Photo of the day
"The colours of fall simply display that which is truly "inside" mother nature"

The photo of the day as well as all my photos are available as Limited Edition Prints, Small Prints, or as Fine Art Photography Cards that come with their own envelope at Larsphotography.com

Sunday, December 7, 2008

Sharpening and Colour Correction

If you are using the Unsharp mask feature to sharpen your images for the web you may have noticed that the sharpening can sometimes add a colour cast.  

You can correct this as well as change the amount of sharpening AFTER you have applied the Unsharp mask - here's how.

Choose Filter>Sharpen>Unsharp Mask and choose your settings.  After you have clicked "OK", immediately go to Edit>Fade Unsharp Mask.  To help correct the colour cast  choose Luminosity for the blend mode and to decrease the sharpening effect you can
 change the opacity to a lower number.

Photo of the Day.
Nature is constantly in a state of renewal and replenishment. It's only when man interferes that this balance is interrupted.

The photo of the day as well as all my photos are available as Limited Edition Prints, Small Prints, or as Fine Art Photography Cards that come with their own envelope at Larsphotography.com

Thursday, December 4, 2008

Convert to sRGB profile for the web

I am quite often asked about issues concerning colour display on the web.  One of the most common problems is that the image is not displaying correctly because it does not have the proper profile assigned to it.  Here is how to solve that problem:

Before saving the image as a jpeg go to Edit>Convert to Profile and choose the sRGB colour space.  This is the lowest-common-denominator colour profile that assures that your im
age will work well for the web.  

You should also do this previous to using the "Save for Web" function as well.

Photo of the Day
"The beauty of Lake Louise is never as evident as it is in its winter coat"

The photo of the day as well as all my Photos are available as Limited Edition Prints, Small Prints, or as Fine Art Photography Cards that come with their own envelopes at (Larsphotography.com

Tuesday, December 2, 2008

Neutralize Your Image

Most of us have had images that have a colour cast to them at one point or another and there are a multitude of methods for correcting neutralizing this cast.  

This is a relatively simple method that will work with MOST images.

Duplicate the image and then use Filter>Blur>Average. 

Add a Levels (or Curves) adjustment layer (Layer>New Adjustment Layer>Levels or Curves or use the drop down menu on the layers palette).

Use the Set Gray Point eyedropper (the middle eyedropper) and click on the duplicated/averaged file.

Uncheck the eye of the blurred layer and the adjustment layer should now have neutralized the colour cast.

Cheers,

Lars

Photo of the Day:
"While winter brings its own challenges for photographers, one would be remiss in not getting shots such as this where patterns and colour come together in a winterland of white to provide contrast"


The Photo of the day as well as all my Photos are available as LImited Edition Prints, Small Prints, or as Fine Art Photography Cards that come with their own envelopes at Larsphotography.com

Monday, December 1, 2008

Copyright Brushes

Ever wondered how people put those creative copyright logos on their photos with such ease such as my logo at left and below on the Photo of the Day?  Here's a quick tutorial on how that can be done.

Quick and easy with text:
We are going to make a brush that can  be resized however large or small you would like it.

-In Photoshop or Elements choose the type tool and type your copyright.
-From the Select Menu >Load Selection
-A dialogue will come up and let it select the layer transparency.
-From the Edit Menu>Define Brush Preset
-Name the brush
-It is now available as a brush from the brush palette.
-You can now choose that brush, then choose the colour (can choose the opacity as well), choose the size, and then move the brush to where you want to watermark and click the mouse once.  That will leave a copy of the brush as you defined it, right where you want it.

Simple fast and easy.  Happy Copyrighting!

Cheers,

Lars

Photo of the Day:

"I can only imagine what nature would be like if the wildlife complained about the weather as much as we did!"


The Photo of the day as well as all my Photos are available as Limited Edition Prints, Small Prints, or as Fine Art Photography Cards that come with their own envelopes at Larsphotography.com